We know how great LinkedIn (and Sales Navigator) is for finding new prospects and leads. While you can use Prospects.so across different platforms, few are quite as successful as LinkedIn. After all, it’s the hub of professionals. Whatever niche you’re in, you’re bound to find people on there who are in need of your services.
As long as you can find them.
That’s where Prospects.so comes in. With our platform, you’re able to launch smart outbound campaigns that zone in on your target to effectively let them know what value you can bring. What’s more, Prospects.so is fully linked with your Pipeline.so CRM, meaning you can easily track the effectiveness of your campaign and link it to your sales efforts further down the funnel.
But before we can move our prospects along the pipeline, we need to find them, make contact with them, and nurture them. This is how you do that!
Finding your target
Having already identified who your ideal target audience is, you should be able to come up with a list of potential keywords you can use to find them.
Begin by typing one of those keywords into LinkedIn. Let’s use “Website Developers” as an example:
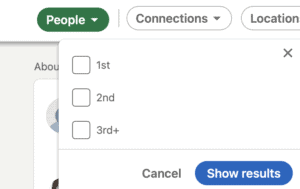
Then click “People” and choose the connection type you want for your campaign, whether 1st, 2nd, or 3rd.
The one you choose will depend on the type of campaign you want to run. If it’s a messaging campaign, the 1st degree connections will probably perform the best. If your goal is more based around expanding your network, then 2nd or 3rd is better. That said, with 3rd degree connections it’s best not to make a Connection Request as it’s considered too “cold” for it to be successful. Instead, target them through InMail or email campaigns.
Beginning your first campaign
Now that you have your audience identified on LinkedIn, open up your Prospects.so account and click on “Create New Campaign”.
Copy the URL from your LinkedIn search.
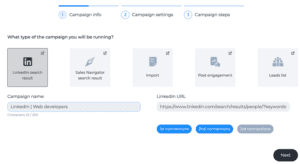
Then you simply insert your campaign name and post the LinkedIn URL where instructed. The connection button should automatically recognize which it is from the URL you pasted.
When all this is done, click next.
Establishing the campaign’s settings
Here you can begin playing with who you want your campaign to reach.
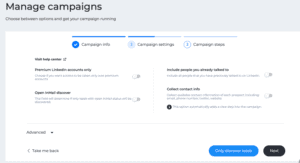
Let’s quickly go through what each one does:
Premium LinkedIn accounts only: Will only contact leads that have a LinkedIn Premium account.
Open InMail discovery: Targets leads with profiles that are open to InMails
Include people you already talked to: Want to reconnect? Or, on the other hand, don’t want to annoy anyone? Toggle the setting you would like.
Collect Contact Info: Collect whatever information the lead has publicly available on their profile.
Advanced settings
Beneath the four main settings, you will find some advanced ones. When opened up, it will show:
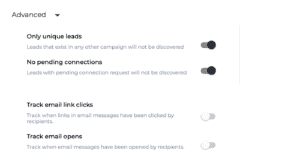
Only unique leads: This allows you to include or exclude links that also appear in other Prospects.so campaigns you have running.
No pending connections: Want to contact someone who already has a pending connection from you?
Track link clicks: If your email contains a link, you can see if the lead has clicked on it.
Track email opens: See who has opened the email.
Optional scheduling

Finally, below the advanced settings, you have the option to schedule your campaign based on a start date, time, and the ability to choose your time zone. If you click on “Only discover leads,” the information will be downloaded in a CSV file.
And that’s the first part done! Simply click “Next” and you can begin creating your Smart Sequence.
Creating Smart Sequences for your campaign
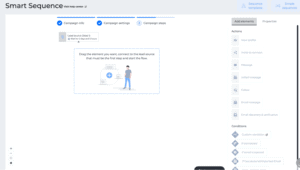
Once you get to the Smart Sequence stage, you will see a dashboard that looks like this:
There is a wide variety of elements and conditions you can use here. Once you decide which one you want, simply click and drag it to the workspace dashboard to create your sequence.
Take all the time you need to explore the personalizable elements, where you can insert messages or GIFs, etc.
Example of a message box:
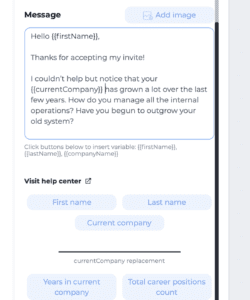
The whole process is quite simple and intuitive—and can be adapted as you see fit. With the Smart Sequences, you can completely customize your messaging depending on a prospect’s specific behavior.
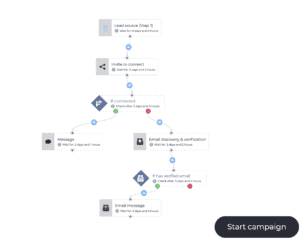
One of the most powerful tools in doing this is the “if/then (condition)” step, which allows you to stop the messaging or change the messaging in response to a prospect. For example, if someone denies your Connection Request, you can assume that they’re not interested. In this instance you would have an if condition that says:
If connection is accepted, send message. Or If connection is rejected, discover and verify email. (See image below.)
As you can see above, the flow can be as simple or as complicated as you would like it to be! This means you can continue adjusting your methods based on what works (especially when linked to Pipeline.so).
Before long, you’ll have transformed your campaign into a highly optimized tool for capturing new leads—and converting new customers.
Want to find out more about Prospects.so and Smart Sequences? Reach out to us today and we’ll get back to you as soon as possible!


